![]()
![]()
![]()
![]()
Here are samples of what you will find in Section 2
of the downloadable Tutorial on Excel macros
Print this page to read it at home, at the office, on the bus or the train
Excel Macros Section 2: VBA (Macros) Vocabulary
In the first section you have discovered the Visual Basic Editor and the Macro Recorder. You have learned how to communicate with Excel and how to test your VBA procedures (Macros).
In this second section you will discover the programming language itself: VBA or Visual Basic for Application. You will learn the vocabulary to ask anything from Excel. After section 2 you will be able to develop small and useful macros and even very complex programs.
Here is a sample of what you will find in lchapter 11
of the downloadable Tutorial on Excel macros
VBA Coding Tips
When you start assembling VBA words into sentences and paragraphs, it is said that you are coding or developing VBA code. In this lesson you will learn important coding tips and many special VBA words. Here is a tip and an exercise that will give you an idea of what you will find in the complete chapter 11 of the Downloadable Tutorial on Excel Macros.
Coding Tip 1
Always key in your code in lower case letters. If the spelling is right, the necessary letters will be capitalized. If no letter gets capitalized .... check your spelling.
Exercise 1-1
Step 1: Open a new workbook in Excel and use the ALT/F11 keys to go to the visual basic editor.
Step 2: In the code window of any of the sheets copy/paste the following macro:
Sub proTest()
activecel.cop
End Sub
Notice that there are no capital letters in activecel.cop because both words are misspelled.
Step 3: Add a second "l" to "activecell" and an "y" to "copy" and then click "Enter". The sentence now reads: Activecell.Copy with a capital "A" and a capital "C" because both words are spelled correctly.
You now understand that significant letters are capitalised in each correctly spelled VBA word when you move away from the line.
Step 5: Close Excel without saving anything
Here is a sample of what you will find in lchapter12
of the downloadable Tutorial on Excel macros
Managing VBA Coding Errors
The Visual Basic Editor will help you avoid errors in coding in many different ways. You will not have to wait at the end to be told that there is something wrong with your macro.
Spelling Errors
You have seen in lesson 11 the VBE capitalise letters to let you know that there are no spelling errors.
Syntax Errors
The VBE will also tell you that there is a syntax error in what you have just written by making the font red and showing you a message box.
Exercise 1
Step 1: Open a new workbook in Excel and use the ALT/F11 keys to go to the visual basic editor (VBE).
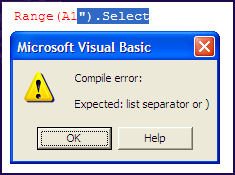
Step 2: In the code window of any of the sheet copy/paste the following line of code: Range(A1").Select and click "Enter".
You get the following message box telling you that you are missing a "list separator". Look for the error before the segment highlighted in blue. We can deduce that VBA is talking about the missing quotation mark.
Step 3: Click on the "OK" button.
Step 4: Add the missing quotation mark, use the mouse to move the cursor to the end of the sentence and click "Enter". The font is black meaning that everything is correct.
Exercise 2
Step 1: In the code window that you have used for exercise 1 copy/paste the following line of code:
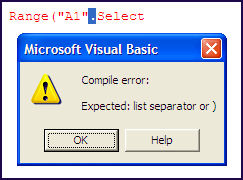
Range("A1".Select and click "Enter".
You get the following message box telling you that you are missing a "list separator". Look for the error before the segment highlighted in blue. We can deduce that VBE is talking about the missing parenthesis. Both the quotation marks in the exercise above and the parenthesis in this exercise are considered as "list separator" by the VBE.
Step 2: Click on the "OK" button.
Step 3: Add the missing parenthesis, use the mouse to move the cursor to the end of the sentence and click "Enter". The font is black meaning that everything is correct.
Step 4: Close Excel without saving anything
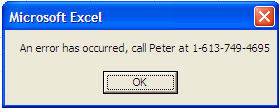
There are many other ways that the VBE uses to alert you to coding errors. You will learn about them all in the downloadable tutorial on Excel macros. You will also learn how to use "If" statement to catch errors during the execution and how to use the OnError statement to generate user friendly error messages like the following:
Here is a sample of what you will find in lchapter13
of the downloadable Tutorial on Excel macros
VBA Code for the Application
Application is a VBA object, IT IS EXCEL. For example: Application.Quit will close Excel all together.
Exercise 1a
Step 1: Open a new workbook in Excel and use the ALT/F11 keys to go to the visual basic editor (VBE).
Step 2: Copy the following macro in the code window of any sheet. As you can read, you are asking Excel to close itself.
Sub testLesson13a1()
Application.Quit
End Sub
Step 3: As you have learned in lesson 7, go to Excel and run the macro from the menu bar (Excel before 2007) or the ribbon (Excel since 2007).
Step 4: You will be asked if you want to save the workbook. Answer "No" and Excel will close itself.
Exercise 1b
If you do not want to be bothered by the alert to save your workbook you will add a line of code to the small macro: ActiveWorkbook.Saved = True
Step 1: Open a new workbook in Excel and use the ALT/F11 keys to go to the visual basic editor (VBE).
Step 2: Copy the following macro in the code window of any sheet. As you can read, you are asking Excel to close itself but saying first that the workbook has already been saved.
Sub testLesson13a1()
ActiveWorkbook.Saved = True
Application.Quit
End Sub
Step 3: Run the macro from Excel as you did with the previous one.
Excel will just close itself without asking you anything.
There is a word that you can use with Application that will neutralise all the alerts that Excel can send your way. Discover this word and many others that you can use in combination with Application in the downloadable course on Excel macros.
There are many other words that you can use in combination with Application. Among them, two important words are:
ScreenUpdating (Application.ScreenUpdating)
When you do not want to see your screen follow the actions of your VBA procedure (macro), you start and end your code with the following sentences:
Application.ScreenUpdating = False
Then at the end:
Application.ScreenUpdating = True
Exercise
Step 1: Open a new workbook in Excel and use the ALT/F11 keys to go to the visual basic editor (VBE).
Step 2: Copy the following macro in the code window of any sheet. As you can read: starting in cell A1 a value of "99" will be entered in the selected cell then the cursor will move one cell down to enter "99", repeat the process until the row number of the selected cell is 3000 and come back to cell A1.
Sub testLesson13b1()
Range("A1").Select
Do Until Selection.Row = 3000
Selection.Value = 99
Selection.Offset(1, 0).Select
Loop
Range("A1").Select
End Sub
Step 3: Run the macro from Excel as you did with the previous one.
Step 4: Remove all the "99" from the cells
Step 5: Copy the following macro in the code window of a new workbook and run it. Two lines of code have been added to the previous macro to prevent all the steps of the action to be seen on the screen.
Sub testLesson13b2()
Application.ScreenUpdating = False
Range("A1").Select
Do Until Selection.Row = 3000
Selection.Value = 99
Selection.Offset(1, 0).Select
Loop
Range("A1").Select
Application.ScreenUpdating = True
End Sub
Step 6: Run the macro from Excel as you did with the previous one. You will see a blank sheet, no movement whatsoever and then a sheet where cells A1 to A3000 are equal to "99".
Sometimes you or the users might want to see the action. Some other times you or the user do not want to see the action. It is up to you to use the sentence or not.
You can even use the pair of sentences (as below) anywhere within a long macro to refresh the screen at significant points in the process. With the pair of sentences you call for a refreshment with Application.ScreenUpdating = True and then interrupt the refreshment process until the next refreshment with Application.ScreenUpdating = False. Before the end of the macro you will use a final Application.ScreenUpdating = True.
The pair of refreshing sentences:
Application.ScreenUpdating = True
Application.ScreenUpdating = False
Step 7: Close the workbook without saving anything
Here is a sample of what you will find in lchapter14
of the downloadable Tutorial on Excel macros
VBA Code for Workbooks
To develop a VBA procedure that is triggered by an event relating to the workbook (when you open it, when you save it, when you close it) see the VBA lesson on events.
ThisWorkbook
ThisWorkbook is the workbook within which your VBA procedure runs. So if you write:
ThisWorkbook.Save
The workbook within which your VBA procedure (macro) runs will be saved.
If you want to close the workbook within which your VBA procedure (macro) runs without saving it you will write these two lines of code:
ThisWorkbook.Saved=True
ThisWorkbook.Close
Verifying the existence of a file
When you want to verify if a certain file exists on your disk you will use the following code that means "If the file "C:\Stuff\toto.xls" does not exist then":
If Dir("C:\Stuff\toto.xls") = "" Then
You could also use a sentence that means "If the file "C:\Stuff\toto.xls" does exist then":
If Dir("C:\Stuff\toto.xls") <> "" Then
If you are looking in the same folder as the file in which the macro runs you can simplify the VBA code:
If Dir("toto.xls") <> "" Then
In the downloadable tutorial on Excel macros you will find many other uses for Dir including opening all the files of a folder to generate a consolidated database (whatever the number of files in the folder). You will also learn about Path, ActiveWorkbook, Windows, Kill, and many other VBA words to work with one or many workbooks.
Here is a sample of what you will find in lchapter15
of the downloadable Tutorial on Excel macros
VBA Code for Worksheets
To develop a VBA procedure that is triggered by an event relating to the worksheet (when you select it, when you leave it...) see the VBA lesson on events.
Sheets
You access a worksheet named " Balance" with:
Sheets("Balance").Select
Note that the word "Sheets" is plural and always use the quotes within the parenthesis
You cannot select a sheet that is hidden so you will need to write:
Sheets("Balance").Visible= True
Sheets("Balance").Select
and then if you want to hide the sheet again:
Sheets("Balance").Visible= False
The name of a sheet must not have more than 31 characters and should not include certain special characters like " ? : \ / [ ]" . If you do not respect these rules your procedure will crash.
The following lines of code will generate an error message:
Sheets("Sheet1").Name= "Balance and Introduction to Numbers" because there are more than 31 characters including the spaces
Sheets("Sheet1").Name= " Balance: Introduction" because of the special character :
Sheets("Sheet1"
).Name= " " because the name cannot be blank
You can not go directly from a sheet to a cell on another sheet. For example if the active sheet is "Balance" and you want tot go to cell A1 of a sheet named " Results" you cannot write:
Sheets("Results").Range("A1").Select
You must take two steps:
Sheets("Results").Select
Range("A1").Select
Here is a sample of what you will find in lchapter16
of the downloadable Tutorial on Excel macros
VBA Code for Cells and Ranges
Many beginners start their career using Cells. For example:
Cells(1,1).Select means (row 1, column 1) and is the same thing as Range("A1").Select and
Cells(14,31).Select means (row 14, column 31) and is the same as Range("AE14").Select.
We strongly recommend that you use Range instead of Cells to work with cells and groups of cells. It makes your sentences much clearer and you are not forced to remember that column AE is column 31.
The only time that you will use Cells is when you want to select all the cells of a worksheet. For example:
Cells.Select
To select all cells and then empty all cells of values or formulas you will use:
Cells.ClearContents
Range
To select a single cell you will write:
Range("A1").Select
To select a set of contiguous cells you will use the colon and write:
Range("A1:G5").Select
To select a set of non contiguous cells you will use the comma and write:
Range("A1,A5,B4").Select
To select a set of non contiguous cells and a range you will use both the colon and the comma:
Range("A1,A5,B4:B8").Select
Offset
The Offset property is the one that you will use the most with Range to move around the sheet.
To move one cell down (from B2 to B3): Range("B2").Offset(1,0).Select
To move one cell to the right (from B2 to C2): Range("B2").Offset(0,1).Select
To move one cell up (from B2 to B1): Range("B2").Offset(-1,0).Select
To move one cell to the left (from B2 to A2): Range("B2").Offset(0,-1).Select
To move one cell down from the selected cell:
ActiveCell.Offset(1,0).Select
As you notice the first argument between the parentheses for Offset is the number of rows and the second one is the number of columns. So to move from A1 to G6 you will need:
Range("A1").Offset(5,6).Select
You will use very often the following piece of code . It selects a cell PLUS 4 more to the right to be copied/pasted somewhere else:
Range(ActiveCell,ActiveCell.Offset(0,4)).Copy
Notice the comma after the first ActiveCell and the double closing parentheses before the Copy.
There are many important VBA words to discover in the downloadable Tutorial on Excel Macros. You have already read something about Range, Cells, Offset, ActiveCell, read some more about them and about many other powerful words like CurrentRegion, UsedRange, End(xlDown), Formula, Value, FormulaR1C1, ClearContents, Delete, and many more.
Here is a sample of what you will find in lchapter17
of the downloadable Tutorial on Excel macros
VBA Code for Message and Input Boxes
In VBA for Excel the message box (MsgBox) is the primary tool to interact with the user. For example you might want to tell the user that a long macro has finished running.
Exercise 1
Step 1: Open a new workbook and use the ALT/F11 keys to move to the Visual Basic Editor.
Step 2: Copy/Paste the following macro from here into the code window of any sheet.
Sub proLessson17a()
Sheets("Sheet1").Select
Range("A1").Value = 695
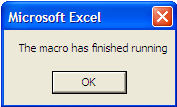
MsgBox "The macro has finished running"
End Sub
Notice the space following MsgBox and the use of quotation marks surrounding the text
Step 3: Use the ALT/F11 keys to go back to Excel and run the macro proLessson17a.
The value 695 is entered in cell A1 and the following message box appears.
Step 4: Delete the macro in the Visual Basic Editor and the value 695 from cell A1
Exercise 2
You might want to tell the user where he will find the result.
Step 1: Use the ALT/F11 keys to move to the Visual Basic Editor.
Step 2: Copy/Paste the following macro from here into the code window of any sheet.
Sub proLessson17b()
Sheets("Sheet1").Select
Range("A1").Value = 695
MsgBox "The result is in cell ""A1"""
End Sub
Notice the space following MsgBox, the use of quotation marks surrounding the text and the double quotation mars around A1 because we want the address to show on the message box between quotation marks.
Step 3: Use the ALT/F11 keys to go back to Excel and run the macro proLessson17b.
The value 695 is entered in cell A1 and the following message box appears

Step 4: Delete the macro in the Visual Basic Editor and the value 695 from cell A1
Exercise 3
Instead of telling the user that the value is in cell A1, you might want to tell him what the result is in the message box itself.
Step 1: Use the ALT/F11 keys to move to the Visual Basic Editor.
Step 2: Copy/Paste the following macro from here into the code window of any sheet.
Sub proLessson17c()
Sheets("Sheet1").Select
Range("A1").Value = 695
MsgBox "The result is " & Range("A1").Value
End Sub
Notice the space following MsgBox, the use of quotation marks surrounding the text, the space at the end of the text and the spaces surrounding the ampersand.
Step 3: Use the ALT/F11 keys to go back to Excel and run the macro proLessson17c.
The value 695 is entered in cell A1 and the following message box appears
Step 4: Close Excel without saving anything.
You can use the message box to inform the user. You might also ask the user (with a Yes/No message box) if he is sure that he wants a certain critical procedure to run (deleting things).
There are many types of message boxes (information, alert, exclamation or questions. Then if you need an input from the user you will start using the input box.
For more elaborate message boxes and input boxes see the downloadable Tutorial on Excel macros.
Here is a sample of what you will find in lchapter18
of the downloadable Tutorial on Excel macros
VBA Code for Databases
When Excel recognises you set of data as a database it offers you very powerful database functionalities like sorting and filtering.
Deactivating filters
When you work in an Excel database you might want to make sure that all data filters are off. To this end you will start your procedure with two "If"statements. For example with a database starting in cell A1 here are the two sentences:
Range("A1" ).Select
If ActiveSheet.AutoFilterMode = True Then Selection.AutoFilter
If ActiveSheet.FilterMode = True Then ActiveSheet.ShowAllData
Sorting Data
Here is a simplified Excel macro to sort data using a criteria in one field. The following Excel macro will work with any size database starting in cell A1 and it will work in any version of Excel (1997 to 2010).
Sub proFilter()
Range("A1").Sort Key1:=Range("A2"), Order1:=xlAscending, Header:=xlYes
End Sub
Try the Excel macro above with a small table like the following (as you have leand how in the basic exercises for beginners):
| Name | Number |
| Jones | 1 |
| Tom | 2 |
| Barry | 3 |
| Peter | 4 |
Here is another simplified Excel macro sorting data using criteria in three different fields.
Sub proFilter()
Range("A1").Sort Key1:=Range("A2"), Order1:=xlAscending, Key2:=Range( _
"B2"), Order2:=xlAscending, Key3:=Range("C2"), Order3:=xlAscending, _
Header:=xlYes
End Sub
The code in the two procedures above is much simpler than the following recorded macro in Excel 2007 and 2010. This recorded macro will not work in earlier versions of Excel (1997 to 2006).
ActiveWorkbook.Worksheets("Sheet1").Sort.SortFields.Clear
ActiveWorkbook.Worksheets("Sheet1").Sort.SortFields.Add Key:=Range("A2:A7"), _
SortOn:=xlSortOnValues, Order:=xlAscending, DataOption:=xlSortNormal
ActiveWorkbook.Worksheets("Sheet1").Sort.SortFields.Add Key:=Range("B2:B7"), _
SortOn:=xlSortOnValues, Order:=xlAscending, DataOption:=xlSortNormal
ActiveWorkbook.Worksheets("Sheet1").Sort.SortFields.Add Key:=Range("C2:C7"), _
SortOn:=xlSortOnValues, Order:=xlAscending, DataOption:=xlSortNormal
With ActiveWorkbook.Worksheets("Sheet1").Sort
.SetRange Range("A1:E7")
.Header = xlYes
.MatchCase = False
.Orientation = xlTopToBottom
.SortMethod = xlPinYin
.Apply
End With
In the downloadable tutorial on Excel macros we offer you much more vocabulary to work with Excel databases and also many more simplified macros that can be used in all versions of Excel. You can you can copy/paste any of them into your own workbooks.
Here is a sample of what you will find in lchapter19
of the downloadable Tutorial on Excel macros
VBA Code for tatements
Among the VBA statements that you will discover in the downloadable tutorial on Excel macros, there are the "If" statement including Then, ElseIf and End If, there is the "Do" statement including Loop, Until, While and Exit, there is the "For" statement including To, Step, Next and Exit, there is the powerful "Select Case" statement including Case, End Select and Exit and other statements.
A lot of visitors ask us how they can delete the entire lines when a certain cell is empty. For example, in the table below rows 2 and 5 should be deleted:
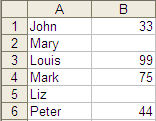
First enter xxx where you want the loop to stop (below the last value: B7). Select the cell at the top of the column containing the values to be considered (B1)and run the macro.
Sub proDelete()
Range("B1").Select
Do Until Selection.Value = "xxx"
If Selection.Value = "" Then
Selection.EntireRow.Delete
Else
Selection.Offset(1, 0).Select
End If
Loop
Range("A1").Select
End Sub
If you have completed the free exercises "Free Basics", just copy/paste the macro above in the Visual Basic editor and run it.
Exiting a Loop
In the loop above if you want the loop to stop when it finds the value 99 you can add this line of code within the loop:
If Selection.Value = 99 Then Exit Do
Exit allows you to get out of almost anything like:
Exit Sub
Exit For
Exit Do
Here is a sample of what you will find in lchapter20
of the downloadable Tutorial on Excel macros
VBA Code for Functions
There are three topics in this lesson:
- using Excel functions within macros,
- using VBA functions within macros,
- creating new Excel functions with VBA.
Excel Functions
Some of the functions that you find in Excel are available through macros in this form:
Range ("C1").Value=
Application.WorksheetFunction.Sum(Range("A1:A32"))
this sentence sums the values of cell A1 to A32 and stores the total in cell C1.
VBA Functions
Here are two VBA functions that you will use within your Excel macros:
LCase, UCase
The " If" statements are case sensitive. When
you test a string of characters and you do not know if the user will enter upper case or lower case letters, use the LCase or UCase functions within your " If" statement so that however the user enters his answer the statement will work.
If
LCase(Selection.Value)= "yes" then...
or
If
UCase(Selection.Value)= "YES" then...
Here is a sample of what you will find in lchapter 21
of the downloadable Tutorial on Excel macros
VBA Code for Variables
You will start developing complex and sophisticated programs in Excel and you will start working with very large sets of data when you discover the variables.
A variable is an object that you create and in which you can store text, dates, numbers or almost anything else. Why should you use variable? The first good reason is to make your code dynamic, to avoid hard coding some values.
Hard Coding vs Dynamic Coding
You are hard coding when you write:
Workbooks.Open "MyFile.xls"
You are dynamically coding when you enter the name of the file in an cell (A1) of your Excel sheet and you write.
varWorkbook=Range("A1").Value
Workbooks.Open varWorkbook
At this point you or the user can change the name of the workbook to open in cell A1 instead of going to the VBA code in the Visual Basic Editor.
You will also create variables to count the number of rows, store the result in a variable and then do something as many time as there are rows.
For varCounter = 1 to varNbRows
Selection.Value=Selection.Value*2
Selection.Offset(1,0).select
Next
In the VBA procedure above the value in each cell is multiplied by 2 then the cell below is selected. This action is repeated as many times as there are rows in the set of data.
Here is a sample of what you will find in lchapter 23
of the downloadable Tutorial on Excel macros
VBA Code and SQL
SQL stands for Structured Query Language and is the language used to extract data from almost all databases like Access and SQL Server from Microsoft or, Oracle, Sybase, SAP and also most accounting applications. You can also extract data from the Internet, from text files and from other Excel or CSV files.
Basically you need a connection (varConn in the macro below) and an SQL sentence (varSQL in the macro below) to automate the extraction of data for reporting purposes. In the example below an SQL query extracts all the data from a small Acces database.
Click here to download the small Access database and test the following code from a workbook sitting in the same folder.
Sub proSQLQueryBasic()
Dim varConn As String
Dim varSQL As String
Range("A1").CurrentRegion.ClearContents
varConn = "ODBC;DBQ=test.mdb;Driver={Driver do Microsoft Access (*.mdb)}"
varSQL = "SELECT tbDataSumproduct.Month, tbDataSumproduct.Product, tbDataSumproduct.City FROM tbDataSumproduct"
With ActiveSheet.QueryTables.Add(Connection:=varConn, Destination:=Range("A1"))
.CommandText = varSQL
.Name = "Query-39008"
.Refresh BackgroundQuery:=False
End With
End Sub
Open the Excel files vba-sql1 and vba-sql2 for a complete explanation of the code and much more on queries. These two Excel workbooks are part of the Tutorial on Excel Macros.
Here is a sample of what you will find in lchapter 24
of the downloadable Tutorial on Excel macros
VBA Code for Other Purposes
Working with other Microsoft programs using VBA within Excel
Within Excel you can open another program and even develop a program within it using VBA. For example here is a short macro that opens Word, then a new document to copy/paste the content of 2 cells from Excel to Word and save the Word document in the same directory as the workbook in which the macro runs:
Exercise
Step 1: As you have learned how to in the "Free Basics", copy/paste the following macro in a new workbook that you will save as word.xlsm.
Sub proWord()
Dim varDoc As Object
Set varDoc = CreateObject("Word.Application")
varDoc.Visible = True
Sheets("Sheet1").Range("A1:B1").Copy
varDoc.documents.Add
varDoc.Selection.Paste
varDoc.activedocument.SaveAs ThisWorkbook.Path & "/" & "testWord.doc"
varDoc.documents.Close
varDoc.Quit
Application.CutCopyMode = False
End Sub
Step 2: Enter values in cells A1 and B1 (your first and lat name for example).
Step 3: Run the macro
You end up with a Word document named testWord .Doc in the same directory as the Excel workbook in which the macro runs. The Word document consists of a single sheet with a two cells table with the values of cell A1 and B1 of the workbook.
Notice that you use VBA for Word within the object varDoc that you have created. If you do not know VBA for Word remember that there is also a Macro Recorder in Word. The object varDoc can be visible or you can work within it without bringing it on screen with:
varDoc.Visible = False
API Working with Windows
API stands for Application Programming Interface and consists of a collection of functions that provide programmatic access to the features of the operating system (Windows). When you use API's within VBA for Excel not only do you control Excel but also most parts of Windows.
To organize your discovery of Excel macros, the downloadable Tutorial on Excel Macros is divided in three sections (all 3 sections part of the single download):
Section 1: Excel Macros Programming (Chapters 1 to 10)
This section is about recording, writing, modifying and testing macros in the Visual Basic Editor. You will also learn about security and discover "events" (an event is what starts the macro).
Section 2: Excel VBA Vocabulary (Chapters 11 to 23)
Developing a macro is communicating with Excel and to do so you need to use a language called Visual Basic for Applications (VBA). In section 2 you will learn all the VBA vocabulary that is essential to work with business data (accounting, sales, production and others).
Section 3: Forms and Controls in VBA for Exce (Chapters 24 to 33)
The userform is a small or large dialog window that you create and allows the user to submit values that will be used by your macros. To these userforms you will add controls (command buttons, text boxes, list boxes and others) and program them.