![]()
![]()
![]()
![]()
Here are samples of what you will find in Section 3
of the downloadable Tutorial on Excel macros
Print this page to read it at home, at the office, on the bus or the train
Excel Macros Section 3: Userforms
In the first section you have discovered the programming environment (Visual Basic Editor and Macro Recorder). In the second section you have learned many useful VBA words (code). After these 2 sections of the downloadable tutorial on Excel macros (VBA) you can use all the macros available for free on the Internet and you can build your own.
In section 3 you will learn how to create customized dialog windows (also called userforms).
When the message box or the input box (that you have discovered in lesson 17) is not enough to communicate with the user you can create your own simple or complex dialog windows like the one below.
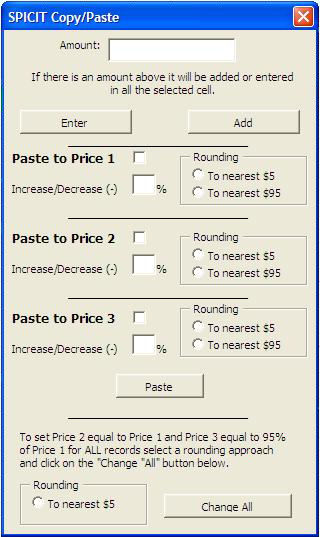
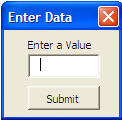
In the downloadable tutorial on Excel macros (VBA) you will find everything that you need to develop simple or very complex userforms. On this website you will find a simple exercise (starting in lesson 24 and ending in lesson 28) that will show you how to develop your first userform. The simple form that you will create (image below) will allow a user to enter a value in the first cell of a database.
Here is a sample of what you will find in chapter 24
of the downloadable Tutorial on Excel macros
Forms (Userforms) in VBA for Excel
When the message box or the input box are not sufficient any more to communicate with the user you need to start developing userforms.
The form is used to require information from the user to feed the VBA procedure. Different basic controls can be added to the userform they are called: labels, text boxes, combo boxes, list boxes, check boxes, option buttons, frames, command buttons, spin buttons and images . To learn more about all the controls see lessons 26 to 33.
Creating a Userform in Excel
Userforms are created in the Project Window of the Visual Basic Editor. You will also find the toolbox that allows you to add controls to your userforms in the Visual Basic Editor.
In the Visual Basic Editor you right click in the project window and you will see this menu appear:
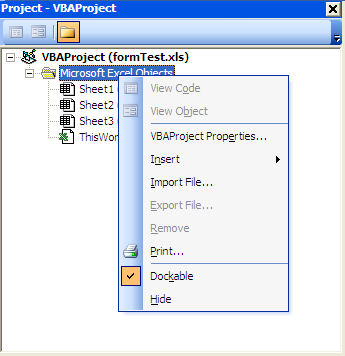
Go to "Insert" and select "UserForm". You will then see the following:
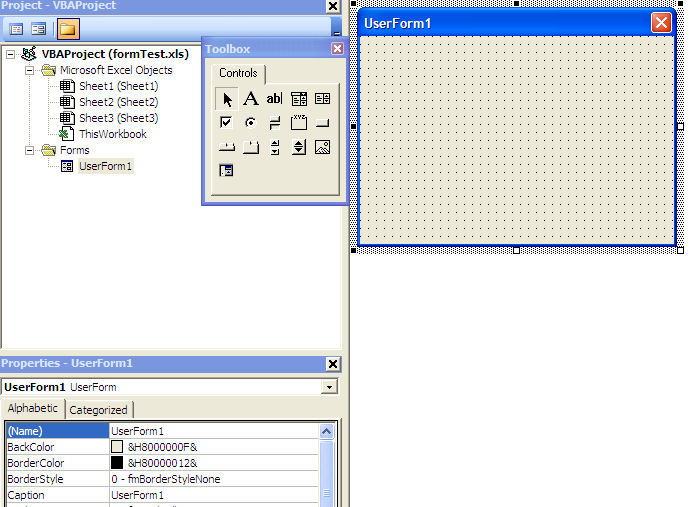
On the right you see the userform that you have just added to your workbook. On the left is the toolbox with all the controls that you can add to your userform. You can hide that toolbox by clicking on the "X" and bring it back by clicking on the toolbox icon ![]() or by going to the menu bar "View/Toolbox". We will use the toolbox later in this section.
or by going to the menu bar "View/Toolbox". We will use the toolbox later in this section.
We hope you have enjoyed this tip
For more on this topic and a complete course on Excel macros download the
Tutorial on Excel Macros
Here is a sample of what you will find in chapter 25
of the downloadable Tutorial on Excel macros
Userforms Properties and VBA Code
In this lesson we will review some of the properties of the userform, we will develop some programming to call the userform and some other programming within the userform itself.
Userforms Properties
When you double click on the userform name in the project window of the Visual Basic Editor the properties windows shows 35 properties of the userform. On this website we will work with two of them. For the other 33 properties see the downloadable course on Excel macros (VBA)
VBA Code within the UserForm
In lesson 9 you have learned about events. The events trigger the macros. There are many events that happen around the userform. For example, a macro can start when the userform is shown (or activated) and another macro can start when a user clicks on a command button. You will learn all these two events in the downloadable tutorial on Excel macros.
We hope you have enjoyed this tip
For more on this topic and a complete course on Excel macros download the
Tutorial on Excel Macros
Here is a sample of what you will find in chapter 26
of the downloadable Tutorial on Excel macros
Labels in VBA for Excel
In the toolbox the label has this icon ![]() . The label is a passive control meaning that the user never really acts on it. It is there to inform the user and to label other controls like text boxes, combo boxes or list boxes.
. The label is a passive control meaning that the user never really acts on it. It is there to inform the user and to label other controls like text boxes, combo boxes or list boxes.
Properties
Among the properties of the label is:
- WordWrap: If you want to write more than one line of text in a label set this property to "True" .
Adding a Label to a Userform
To add a label to a userform you left click on its icon in the toolbox. You move the cursor to the userform, you click again and the label appears. You can then resize it to your liking. If you double click on the label icon in the toolbox you can then click on the form as many times as you need labels. When you are finished adding labels just click once on the label icon of the toolbox.
We hope you have enjoyed this tip
For more on this topic and a complete course on Excel macros download the
Tutorial on Excel Macros
Here is a sample of what you will find in chapter 27
of the downloadable Tutorial on Excel macros
Text Boxes in VBA for Excel
In the toolbox the text box icon is: ![]() .
.
The text box is the simplest control that requires an entry by the user. The user types something in it and this value can then be used in your VBA procedure. You will usually add a label to accompany the text box.
For most controls including the VBA for Excel text box there are general properties that allow you to set the font, the color of the font, the color of the background, the type of background, the type of border and other design features.
As its name says it the text box carries text. To use the contents of a text box as a number, to add dollar signs, decimal and other numerical features see the downloadable tutorial on Excel macros (VBA).
Adding a Text Box to a Userform
To add a text box to a userform you left click on its icon in the toolbox. You move the cursor to the userform, you click again and the text box appears. You can then resize it to your liking. If you double click on the text box icon in the toolbox you can then click on the form as many times as you need text boxes. When you are finished adding text boxes just click once on the text box icon of the toolbox.
We hope you have enjoyed this tip
For more on this topic and a complete course on Excel macros download the
Tutorial on Excel Macros
Here is a sample of what you will find in chapter 28
of the downloadable Tutorial on Excel macros
Command Buttons in VBA for Excel
In the toolbox the command button has this icon ![]() . The command button is a very active control and there is always VBA code behind it.
. The command button is a very active control and there is always VBA code behind it.
The command buttons are usually placed at the bottom of the form and serve to complete the transaction for which the form has been created. The caption of these buttons are usually "Go" , "Run" , "Submit" , "Cancel" , etc.
Properties
Among the other properties of the command button are:
- WordWrap to be able to write more that one line on a button,
- ControlTipText which generates a small comment box when the user moves the mouse over the control. You can use this property to give explanations and instructions about the command button,
Adding a Command Button to a Userform
To add a command button to a userform you left click on its icon in the toolbox. You move the cursor to the userform, you click again and the command button appears. You can then resize it to your liking. If you double click on the command button icon in the toolbox you can then click on the form as many times as you need command buttons. When you are finished adding command buttons just click once on the command button icon of the toolbox.
VBA Code
Most of the VBA code (VBA sentences) is created within the command button when you develop simple userforms. Here are two exercises creating VBA code within the command button.
We hope you have enjoyed this tip
For more on this topic and a complete course on Excel macros download the
Tutorial on Excel Macros
Here is a sample of what you will find in chapter29
of the downloadable Tutorial on Excel macros
Option Buttons, Check Boxes and Frames
In the toolbox the option button has this icon ![]() , the check box has this one
, the check box has this one ![]() and, the frame this one
and, the frame this one ![]() .
.
You do not need to add a label to accompany the check box or the option button because they come with their own.
The check boxes and the option buttons are both used to offer the user a choice. The main difference between check boxes and option buttons is that if you have 5 of each on a form a user can check all 5 check boxes but can only select one of the option buttons.
If you want to create two sets of option buttons read below on frames and option buttons. If you do not want to use frames to create groups of option buttons you will need to use the "GroupName" property of the option buttons. All option buttons with the same GroupName work together.
Properties
- WordWrap to be able to write more that one line in the caption,
- ControlTipText which generates a small comment box when the user moves the mouse over the control. You can use this property to give explanations and instructions about the option button or the check box.
- Enabled and Visible are properties that you can change programmatically to disable or render invisible an
option button
or a check box following a previous selection in another control of the userform.
Frames
Frames are also a passive control. Frames are used to improve the layout of the userform. You can use them around a group of controls that have something in common.
Frames become more important to manage option buttons. If you have two sets of option buttons on a userform and you do not place them within a frame they all work together and you can choose only one. If you put each set within a frame you can choose one in each set.
When you move a frame all its controls move with it.
We hope you have enjoyed this tip
For more on this topic and a complete course on Excel macros download the
Tutorial on Excel Macros
Here is a sample of what you will find in chapter 30
of the downloadable Tutorial on Excel macros
Combo Boxes in VBA for Excel
Before we begin on the Combo Box
The difference between a combo box and a list box is that the combo box is a drop-down list and the user can submit a single value from the drop-down list. The list box shows a certain number of values with or without a scroll bar and the user can select one or more values.
|
Combo Box |
List Box |

If you are looking for a drop-down list (also called pull-down lists) to use on a regular worksheet see the much easier and user friendly Excel drop-down lists in the website on Excel.
When you double click on the combo box in the Visual Basic Editor you will see all its properties in the Properties window .
No programming is needed to submit the list of values that will be offered to the user within the combo box. Look for the RowSource property.
The RowSource Property:
The values that should appear in the drop-down list of the combo box are submitted in the RowSource property. For example, if the value of the RowSource property is Balance!A1:A12 The values residing in cell A1 to A12 of the sheet named Balance will be offered as choices to the user who clicks on the small arrow of the combo box.
The rules to submit the RowSource property is the name of the sheet where the list resides followed by an exclamation point (!), the address of the first cell, a colon and the address of the last cell.
IMPORTANT NOTE: if there is a space or a special character within the name of the sheet where the list resides you must surround the name of the sheet with simple quotes. For example: 'New Balance'!A1:A12.
We hope you have enjoyed this tip
For more on this topic and a complete course on Excel macros download the
Tutorial on Excel Macros
Here is a sample of what you will find in chapter 31
of the downloadable Tutorial on Excel macros
List Boxes in VBA for Excel
Before we begin on the List Box
The difference between a combo box and a list box is that the combo box is a drop-down list and the user can submit a single value from the drop-down list. The list box shows a certain number of values with or without a scroll bar and the user can select one or more values.
|
Combo Box |
List Box |
In the toolbox the list box has this icon ![]() .
.
No programming is needed to submit the list of values that will be offered to the user within the combo box. Look for the RowSource property.
The RowSource Property:
The values that should appear in the drop-down list of the combo box are submitted in the RowSource property. For example, if the value of the RowSource property is Balance!A1:A12 The values residing in cell A1 to A12 of the sheet named Balance will be offered as choices to the user who clicks on the small arrow of the combo box.
The rules to submit the RowSource property is the name of the sheet where the list resides followed by an exclamation point (!), the address of the first cell, a colon and the address of the last cell.
IMPORTANT NOTE: if there is a space or a special character within the name of the sheet where the list resides you must surround it with simple quotes. For example: 'New Balance'!A1:A12.
We hope you have enjoyed this tip
For more on this topic and a complete course on Excel macros download the
Tutorial on Excel Macros
Here is a sample of what you will find in chapter 32
of the downloadable Tutorial on Excel macros
Excel Spin Buttons
Spin Button
In the toolbox the spin button has this icon ![]() .
.
You can ask a user to enter a value directly in a text box but you can make things a little more attaractive by using a text box and a spin button.
The spin button is not really used by itself. Because the spin button does not show its value it is usually used with a text box. The text box shows a number and by clicking on the arrows of the spin button the value in the text box is increased (or decreased) by 1, or 5 or 10...by whatever value that is set within the properties of the spin button.
Properties
Among the other properties of the spin buttons are:
- Min is the minimum value of the spin button. It can be negative
- Max is the maximum value of the spin button. It can be negative
- Small is the value of the change when the user clicks on the arrows
- Large is the value of the change when the user clicks on the scroll bar of the spin button.
We hope you have enjoyed this tip
For more on this topic and a complete course on Excel macros download the
Tutorial on Excel Macros
Here is a sample of what you will find in chapter33
of the downloadable Tutorial on Excel macros
Excel Image Controls
Image Control
There is a control in the toolbox called "Image" . Within this control you can show all types of pictures. You set an image control on a userform and you submit a picture in the property "Picture" . The picture becomes part of the control and userform.
Fitting the Picture
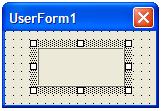
The first thing that you want to do is to fit the picture in the image control to make the size of the control adapt to the size of the picture.
When you are in the Visual Basic Editor and you single click on an image control a frame appears around it with 8 stretchers (picture below). If you double click on the middle stretcher (when a two tips arrow shows) of the right side or on the middle one at the bottom or on the bottom right corner stretcher the image control will adapt to the size of the image. Double clicking anywhere else will take you to the VBA code and will not adapt the control size to the picture size.
PictureSizeMode Property
Another property of the image control is the PictureSizeMode.
If the property is set to the default value 0-frmPictureSizeModeClip the control size can be changed without the picture size being modified. So you can see only part of the picture or there can be a background behind it in a clolor color you can change at will.
If the property is set to the 1-frmPictureSizeModeStretch the picture is resized as the control is. The image fills the control.
If the property is set to the 3-frmPictureSizeModeZoom the picture is resized as the control is but the picture and background are present.
We hope you have enjoyed this tip
For more on this topic and a complete course on Excel macros download the
Tutorial on Excel Macros
To organize your discovery of Excel macros, the downloadable Tutorial on Excel Macros is divided in three sections (all 3 sections part of the single download):
Section 1: Excel Macros Programming (Chapters 1 to 10)
This section is about recording, writing, modifying and testing macros in the Visual Basic Editor. You will also learn about security and discover "events" (an event is what starts the macro).
Section 2: Excel VBA Vocabulary (Chapters 11 to 23)
Developing a macro is communicating with Excel and to do so you need to use a language called Visual Basic for Applications (VBA). In section 2 you will learn all the VBA vocabulary that is essential to work with business data (accounting, sales, production and others).
Section 3: Forms and Controls in VBA for Exce (Chapters 24 to 33)
The userform is a small or large dialog window that you create and allows the user to submit values that will be used by your macros. To these userforms you will add controls (command buttons, text boxes, list boxes and others) and program them.