![]()

![]()
![]()
![]()
![]()
Here is a sample of what you will find in the downloadable Tutorial on Excel macros
Testing Macros in the VBE for Excel
Testing the VBA procedure step by step
NOTE: While you are running the macro step by step you can stop the execution at any time by clicking on the stop button in the toolbar. ![]()
Testing is the most time-consuming part of any VBA project. During the development of a project you will use 20% of your time analysing and designing, 15% programming and 65% testing.
During the testing phase, you will correct bugs, typos and the logical errors. More importantly you will improve your original project, fine tune it, discover better ways to do things and add code.
In lesson 4 you have created your first macro and tested it using the "Run" button. You can also test a macro step by step.
Print this page, open Excel and a open a new workbook. Use ALT/F11 to open the Visual Basic Editor as you learned in lesson 1.
Step 1: Go to Excel and make sure that cells A1, A2 and A3 of Sheet1 are empty.
Step 2: In VBE go to the Code window of Sheet1 and copy/paste the following macro:
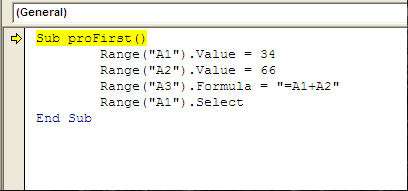
Sub proFirst()
Range("A1").Value = 34
Range("A2").Value = 66
Range("A3").Formula = "=A1+A2"
Range("A1").Select
End Sub
Step 3: Click anywhere within the macro and then press the F8 key at the top of your keyboard. VBE highlights the first line of code in yellow.
Step 4: Right-click on the small yellow arrow and see a menu appear
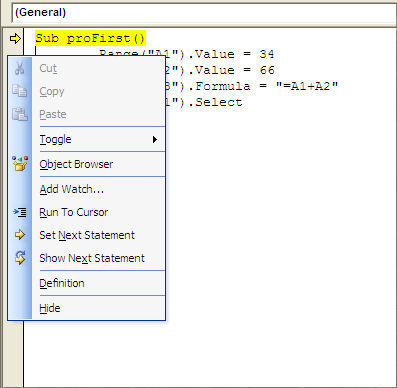
In lesson 4 of the downloadable Tutorial on VBA for Excel you will learn about these precious menu items and everything else that you can do in the Code window. For now let's finish testing this macro step by step.
Step 5: Press on "F8" a second time. No line has been executed yet and if you go to Excel you will see that cells A1 to A3 are still empty. The next time you press "F8" , VBE will execute the yellow-highlighted line.
Step 6: Press "F8" a third time. The yellow-highlighted line is now "Range("A2").Value = 66". VBE has executed the previous line "Range("A1").Value = 34" has been executed so if you go to Excel (ALT/F11) you will see 32 in cell A1.
Step 7: Come back to VBE (ALT/F11) and press "F8" again. Go to Excel and see what happened in cell A2.
Step 8: Come back to VBE (ALT/F11) and press "F8" again. Go to Excel and see that there is a formula in cell A3.
Step 9: Come back to the VBE (ALT/F11) and press "F8" again, cell A1 is now selected in Excel.
Step 10: Press "F8" again. Nothing happens in Excel but "End Sub" is highlighted in yellow
Step 11: Press "F8" again. Nothing happens in Excel no more lines in VBE are highlighted in yellow.
The macro hac been tested, the test is over.
In the code change the addresses A1, A2 and A3 respectively to B1, B2 and B3. Test the macro again. Do it as many times as you want.
You have tested a macro step by step. In the downloadable tutorial you will learn how to test parts of a macro, how to come back a few lines, make changes and re-execute these lines. You will also discover this most important functionality, how to share the screen between Excel and VBE.
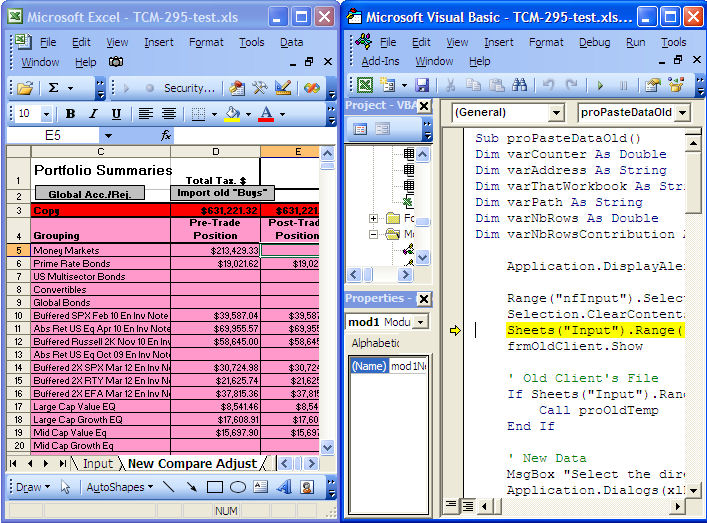
In no other programming environment can you test a procedure step by step while seeing it at work in the spreadsheet on a single screen.
In the picture below you can see the Visual Basic Editor on the left side of a screen and Excel on the right side. While you press the F8 key to execute the macro step by step in the Visual Basic Editor, you can see what is happening in the Excel spreadsheet. You will discover the split screen function in lesson 6 of the downloadable the course on VBA for Excel (Macros).
We hope you have enjoyed this tip
For more on this topic and a complete course on Excel macros download the
Tutorial on Excel Macros
To organize your discovery of Excel macros, the downloadable Tutorial on Excel Macros is divided in three sections (all 3 sections part of the single download):
Section 1: Excel Macros Programming (Chapters 1 to 10)
This section is about recording, writing, modifying and testing macros in the Visual Basic Editor. You will also learn about security and discover "events" (an event is what starts the macro).
Section 2: Excel VBA Vocabulary (Chapters 11 to 23)
Developing a macro is communicating with Excel and to do so you need to use a language called Visual Basic for Applications (VBA). In section 2 you will learn all the VBA vocabulary that is essential to work with business data (accounting, sales, production and others).
Section 3: Forms and Controls in VBA for Exce (Chapters 24 to 33)
The userform is a small or large dialog window that you create and allows the user to submit values that will be used by your macros. To these userforms you will add controls (command buttons, text boxes, list boxes and others) and program them.